This is based on the tutorial by Simon, VK3ELH found here.
1. Hardware requirements
a. QCX built and operational
b. Arduino Uno
c. Computer capable of running the Arduino IDE and AVRDUDE
d. USB cable to connect Uno to computer
e. Jumper leads to connect the Arduino Uno to the ISP header in the QCX – female one end, male other end.
2. Software requirements
a. Arduino IDE – Arduino IDE Link.
b. AVRDUDESS – Go to Zak Kembles blog and download avrdudess - A GUI for avrdude
c. Download the version of the QCX firmware you want to install.
To get the version of firmware you need you will have to be a subscriber to the QRP Labs email list on groups.io. You can join groups.io here.
This is what you'll see at the top of their main groups.io page. Click on the 'SignUp' link to join.

If you're already on groups.io (or just joined and logged in), search for the QRP Labs group. You should find this page where you can subscribe to the list:

After you subscribe and are allowed in ( may take a day for approval), click the files link on the left. Find the 'Firmware for QCX kits' folder and look inside. Here is where you will find the hex files (or links to them) for each release.
Important: Once downloaded, be sure to unzip the file if it is zipped.
3. Preparations
a. Prepare the Arduino Uno
The Arduino needs to be programmed to act as an In System Programmer (“ISP”).
There is a sketch(program) that comes with the Arduino IDE called “ArduinoISP”.
In the Arduino IDE program menus click File>Examples>ArduinoISP>ArduinoISP.
Connect your Arduino to your computer and select the correct board and port from the Select Board Drop-Down Menu (or the Tools menu).

Upload the ArduinoISP sketch.
b. Connect the Arduino to the QCX’s ISP pins as follows:
Arduino Pin Number QCX ISP Pin 10 RESET 11 MOSI 12 MISO 13 SCK GND GND


Power the QCX normally via the 13.8V supply rather than powering it from the Arduino to ensure it gets enough power.
Note: The 5V pin on the QCX is not connected to the Arduino.
4. Flash the new firmware to the QCX
a. Start AVRDUDESS
b. Select “Arduino” as the programmer
c. Select the COM port the Arduino is connected to
d. Enter BAUD rate 19200
e. Select ATmega328P as the MCU
f. Select the path where the new firmware is located
g. Press the Program button.
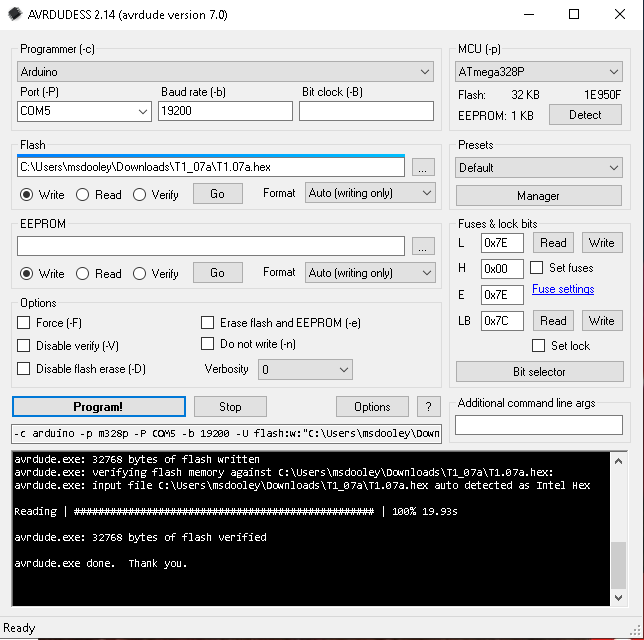
As shown in the picture, you'll know when it is done programming the chip.
This 'modified' procedure worked for me when programming a circa 2017 QCX radio. Your mileage may vary.
Thanks!
Mike Dooley
N5BGZ
Mike Dooley
N5BGZ